Categories

Pages

Supernote Handwriting To Text, Search Notes and Annotations [How To Use]

Supernote is an amazing device for note taking and digital planning. There are plenty of templates around to use. If you own a Supernote ereader, you also get the feature to convert your handwriting to text, search handwritten notes and add annotations on Books and documents. Here is how you can use this feature -

How To Convert Handwriting To Text On Supernote

1. Make sure your device is connected to a Wi-Fi network
2. Go to your Notes
3. Click on New Note icon to create a new note.

Supernote handwriting to text


4. Make sure the real time Recognition is enabled.

Real Time recognition supernote


5. Now a new notebook is there, pick up your pen and write something.
6. Now look at the top of the notebook, there is an icon labeled as A, tap on it, and your handwriting will be converted to text.

Convert to text supernote

Its very simple. You can save it as a text or word document.

How to use a template on Supernote while writing?

  1. Open a New Note
  2. Then tap on the 3 dots icon
  3. From the new MENU select Templates
  4. Then choose a template you like
  5. And write on it.

Can You search handwritten notes on Supernote?

Supernote ereaders allows you to search handwritten notes. It recognizes handwriting in the background allowing you to search handwritten content without needing to convert it to typed text, so unlike some other ereaders you don't have to convert your handwritten notes to text to make it searchable. Keep in mind that this handwritten note search is only possible in a specific document.

How to search handwritten notes?

  • Open your Note file
  • Swipe down from the top of the screen to open the menu and tap the search icon
Search handwritten notes Supernote

  • From the new Menu choose handwriting
  • Type what you want to search and tap the search button and Supernote will show you results within that note file.

Just like this you can search a file. Here is how -

  • Swipe down from the top of the screen to open the menu and tap the search icon
  • From the new Menu choose Files
  • Type the file name or part of the file name (You don't need the exact file name) and tap Search.

Keyword Search on Supernote

You also get the option to search by keyword to find a document with that keyword. If your document has that keyword, it will show up when you search.

Here is how you use it -
  • Open the Search Menu, select Keyword and type the Keyword.
  • Then tap the Search button
  • Then Supernote will display all files with that keyword.

Tip - You can label your notes with keywords and later find them by typing the keywords, it will help you in organizing your notes better.

Annotations on Supernote -

It's easy to add annotations on an EPUB or PDF document, open the file, write where you want on the document. You can also erase them. Here is how -
  • Open the document with annotations
  • Open the toolbar
  • Use the Regular Eraser or Region Eraser on the toolbar to erase the annotation you want to delete. You also get the Erase All option to delete all the annotations on a page.

Final Words

In conclusion, You can easily convert handwriting to text, use and download many templates, write annotations and erase them on your Supernote eReader. That's it. I hope this guide helped you understand how to use these features. Please feel free to give your feedback on this and I'll see you in another one.

My Supernote Screen is Frozen & Unresponsive - How do I fix it?

My Supernote Screen is Frozen & Unresponsive 

If your Supernote eReader is suddenly stuck on a screen and it doesn't respond to touch, what can you do in this situation to return it to normal? Don't worry - There are a few methods to fix this screen freezing problem, Just try the following methods -

1. A Force Reboot -

A forced reboot can give the system a fresh start and fix the frozen screen.

  • Press and hold the power button for 8-10 seconds.
  • Release the button, Now press and hold it again until the Supernote logo shows up and it will turn on.

2. Plug in the charger -

In some cases, because of low battery the screen freezes, but the battery indicator doesn't show its true status. So, plugging in the charger can fix this issue.

  • Charge the device and see if it responds (it should show the Supernote logo)
  • If it doesn't respond after a minute or two, then charge the device for 20-30 minutes.
  • Then, try force rebooting it, as I have explained in method 1.

3. Reset Supernote with a paperclip

Depending on your model, your e-reader may have a reset hole near the power button. You can use a paperclip or pin to soft reset the device.

  • Put the paperclip into the hole and hold it for 5 seconds.
  • The device should reboot now.

4. The last trick - Charging it overnight

If none of the methods I've given above works and the screen stays the same, then leave the device on charging for a long period until it fully charges. You can leave it for charging overnight and check in the morning.

  • If it's turned off, try turning it on
  • If it is still frozen, then for the last time try to force reboot it by using methods 1 and 3 (using a pin)

Bottom Line

If nothing above works for you, you should contact Supernote customer support and explain this issue to them. Here are their contact details -

Mail - feedback@supernote.com, service@supernote.com
Phone - +1 (509) 822-2562

I hope this guide was helpful, feel free to leave feedback in the comment section. I'll see you in the next one.

Sync Supernote Files with Google Drive - Fix Common Errors

How to sync Supernote files with Google Drive?

Syncing your files with Google drive on a Supernote e-reader like A5X, A6X or Nomad is very easy, you just have to follow the steps I have given below and you will be done without any hassle.

Let's jump in

Why Sync your Supernote with Google Drive?

Maybe you're already using Supernote Cloud to sync your files for backup purposes. However, it’s always good to have multiple cloud backups as an extra layer of security to ensure you never lose your Supernote files. And, Google Drive is an efficient way to manage notes and files, especially if you're a student or professional.

Step-by-Step Guide to Syncing Your Supernote with Google Drive


1. Access the menu:

First, Swipe down on the right bezel of your Supernote device to open the Menu.

Supernote menu gesture


2. Go to Settings

Then go to "Settings" > then tap on "Sync". Now you'll see a QR code, a link and a random code.

Supernote settings

Supernote sync

Supernote Google drive sync


3. Authenticate your Google account:

You can scan the QR code on your phone or visit the link shown on the device (This link - https://bind.supernote.com.cn/GoogleDrive)

After scanning the QR code or opening the link you will be redirected to the authentication page where you need to enter the random code and press 'sign in with Google'

Next, Select your Google account if you are already logged in or freshly log in into your google account if you have not.

4. Give permission:

Then the Supernote will ask for permission to access your Google account to sync files on to the Google drive. tap on Confirm to give permission, and you are done.

Supernote Google drive sync


Now you can begin syncing files to Google Drive.

5. Select folders to sync

Return to your Supernote tab, you'll see the "Select Folder" option under "Sync". Tap on it and select the folders you want to sync with Google Drive. Every File inside those folders will be synced with Google Drive. Then finally hit the "Save" button on the top right corner.

Sync supernote files with Google drive


Your sync settings are saved.

6. Start syncing

Now to start the sync swipe down from the top to open the control center and tap the sync icon to start syncing.

Supernote sync with cloud


Where can you find your synced files on Google Drive

After syncing, you can access your files in the folder named "Supernote" within Google drive.. This makes it easy to access your notes and files on any device, whether it’s another e-reader, a tablet, or a PC.

Some tips if you find trouble when syncing on Supernote

Sync Failed or network Connection Failed:

If the sync doesn’t start or it says Synchronization failed or network connection failed then first you need to check your internet connection and ensure it's working properly, and restart your device once and try again.

Folder Not Syncing

If you cant find a folder or file in google drive after syncing then Double-check that the folder you wanted to sync is selected in the Sync settings. If a specific file isn’t syncing, ensure it’s within the selected folder.

Device doesn't match user error

You may see an error like "Device doesn't match user" when syncing your Supernote with Google Drive. This issue can arise if you try to sync a different Google account after authorizing another one. Unfortunately, once a Google account is authorised on your Supernote, you can't authorize a different account without performing a factory reset.

Solution:

Factory Reset:

Factory reset your Supernote. After resetting you will be able to authorize a new Google account without seeing the error - "Device doesn't match user"

Note: Keep in mind that a factory reset will erase everything on your Supernote, so get a backup of your data before doing a reset.

Use Other cloud services

If you don't want to factory reset your Supernote device, then you can use alternatives like Dropbox and OneDrive which works smoothly with Supernote. Dropbox is often considered a simple and easy-to-use cloud service.

That’s all for this guide. Feel free to ask any questions in the comments section below. I’ll see you in the another one ...

Read More:

How To Fix Supernote Cloud Sync Issues - "Sync Failed" "Network Connection Failed" Errors

Supernote Sync Failed - How To Fix?

Every device encounters some issues during its lifetime, and brands and users try to fix them. Supernote users also sometimes face issues like - sync issues where They can't sync their files to the cloud, it says "Sync Failed". However, there is no need to worry, I've got some fixes for this issue. So, let's continue to the solution -

When syncing manually to OneDrive Supernote shows - "Network connection failed"

When you try to manually sync your notes and other files to OneDrive it fails to sync and shows an error message "Network Connection Failed".

In this case, you should check the following and then retry syncing -

  1. Check your Wi-fi connection to make sure it's working, you can try other apps which use data connection to check if they can work or not. If not try a different network.
  2. Restart your device once.
  3. Check for updates if there is one then update it. Here is how to check for updates in Supernote - Swipe down from the top to open the menu > Tap on 'Settings' > Go to Wi-Fi and connect to a network if you are already connected to a proper network then directly go to > System > Tap on 'Check' to see if an update is available.
  4. Set the device time to auto/server time/network time (if it is set to manual) If your device time is different from server or network time, then sync will fail. Change the device to network time and the error will be gone.

Supernote Cloud Not Working - "Sync Failed"

If syncing to Supernote cloud is not working first you should, try the common troubleshooting methods I mentioned in Method 1 above (From checking W-Fi to Device time)

If it's still not working, then try these solutions -

1. Try changing the server - to USA, AMAZON(UK), Japan

To change the server, go to 'Settings' > 'Synchronization' > 'Supernote cloud' >, tick all folders to sync, and hit the 'Save' button. The reason you have to select every folder is when you dont select all the folders you wont be able to change the server. After selecting all the folders and saving go to 'Settings' > 'Security And Privacy' > 'Supernote Cloud Server' > and then change it to US, UK, Japan, etc. It may show as Amazon(United States).

2. Re-login to Cloud account

Try logging out of your cloud account and log in again, then check if the sync works or not.

3. Contact Supernote Support Team

At last, If the error is still not going, then the issue might be related to the Supernote cloud servers, contact the Supernote support team, and they will assist you.

That is all from my side, please do leave your queries and feedback in the comment section below, also you can share what fixed your sync issue on Supernote, this will definitely help others too.

Read more:


Supernote A5X Vs A6X - In Depth Specs Comparison and Which E-Reader is Best for You?

The Ratta Supernote A5X and A6X are two popular e-reader devices. They come with different prices and specifications. But which one of them is better for you? Let’s start the comprehensive comparison to find out -

Supernote A5X VS A6X - Specs Comparison

ModelA5XA6X
Display10.3" ✅
E-ink Mobius
226 PPI

7.8"
E-ink Carta
300PPI✅
FrontlightNoNo
Color
Temperature
NoNo
CPUQuad Core
1.8GHz
Quad Core
1.8GHz
RAM2GB2GB
Storage32GB32GB
OSChauvet OSChauvet OS
Battery3800mAh ✅2900mAh
AudioNoNo
USBType C
Type C
Wi-FiYesYes
BluetoothYesYes
MicroSDNoNo
StylusYesYes
WaterproofNoNo
DimensionN/A188 x 138 x 7.2 mm
Weight375g255g✅
Page Turn
Buttons
NoNo
Price$550$450✅


Display

Supernote A5X has a 10.3" e-ink Mobius screen with a pixel density of 226ppi, while the A6X comes with a 7.8" e-ink Carta screen with a ppi of 300. Clearly, the A6X has a higher pixel density which means a sharper display to view texts and images. The A5X has a larger screen, which is better for those who want a larger screen that allows them to zoom in on the content for better readability.

CPU and Performance

Both devices feature the same quad-core processor clocked at 1.8GHz, along with 2GB of RAM and 32GB of storage. Since they share the same CPU, RAM, and storage type, there is little to no difference in performance.

Battery

3800 mAh vs 2900 mAh. The A5X has a larger battery than the A6X, but it also has a bigger screen, which requires more power. Despite the difference in battery capacity, both devices offer good battery life, and you likely won't see a significant difference in actual usage.

Connectivity

The Supernote A5X and A6X both have Wi-Fi, Bluetooth, and a USB-C port for charging and sharing data. This makes both of them connectivity-rich, making them more customizable, such as using a keyboard via USB or Bluetooth. 

Weight and dimension

The Supernote A6X has dimensions of 188 x 138 x 7.2 mm and weighs around 255g. In comparison, the Supernote A5X weighs around 375g. The A6X is lighter and you will feel more comfortable holding it for longer reading sessions, although it depends from person to person.

Stylus/Digital Pen

Both the Supernote A6X and A5X have a WACOM Active digitizer, which supports digital pen input for writing and note-taking.

Operating System

The Supernote A5X and A6X both run on Chauvet OS, a custom Android-based operating system. Supernote is consistent in providing monthly firmware updates, regularly introducing new features, apps, and optimizations, along with UI improvements.

Final Words

Finally, your choice will depend on your needs/wants. The Supernote A6X is a better option if you want a sharper and smaller display. On the other hand, the A5X is ideal if you want a larger screen and longer battery life, but remember that it's a bit heavier and larger. And of course, we have to consider the prices too. In this case, the A5X is more expensive than the A6X, so the A6X has a cost advantage.

That's it, folks. Let me know which one you would choose. You can drop your queries in the comment section below. I'll see you in the next one ...

You might Like:


Kindle Scribe VS reMarkable 2 - Which is better for note taking in 2025

Remarkable 2 and Kindle Scribe are the best devices from both brands. It's a battle between two top-tier ereaders. These ereaders are not just for reading, but, also for many functions like note taking, drawing, planning, journaling and other productive tools. To compare these two devices - we have to look into their specs and do a comprehensive comparison in terms of reading, note-taking, performance, app support, and stylus pen or marker. so let's get started -

I'm going to divide this comparison into the following parts -
  1. Specs comparison
  2. Reading experience
  3. Note-taking
  4. App Support
  5. Overall best
Kindle scribe vs remarkable 2

Kindle Scribe Vs reMarkable 2 - Specs Comparison

ModelKindle ScribereMarkable 2
Display10.2"
E-ink Carta
300 PPI ✅

10.3"
E-ink Carta
226 PPI
FrontlightYes ✅No
Color
Temperature
Yes ✅No
CPUDual Core
2.0 GHz ✅
Dual Core
1.2GHz
RAM1GB1GB
Storage32GB ✅8GB
OSKindle OSCodex OS
Battery3000 mAh3000mAh
AudioNoNo
USBType CType C
Wi-FiYesYes
BluetoothYesYes
MicroSDNoNo
StylusYesYes
WaterproofNoNo
Dimension196 x 230 x 5.8 mm188 x 246 x 4.7 mm
Weight433g405g✅
Page Turn
Buttons
NoNo
Price$389.99 ✅$449


Kindle Scribe Pros & Cons

Pros:
  • More reading options with access to the Kindle bookstore
  • Equipped with a front light for comfortable reading in low light.

Cons:
  • Supports Microsoft Office integration but lacks Google Drive and Dropbox
  • Requires a subscription to sync with Microsoft Office

reMarkable 2 Pros & Cons

Pros:
  • Exceptional paper-like note-taking experience
  • Supports cloud integration with OneDrive, Google Drive, and Dropbox

Cons:
  • No front light for reading in low-light conditions
  • Requires a subscription to use features like cloud sync and handwriting-to-text conversion

The Reading Experience

Both devices have e-ink screens and can read books but the difference lies in their size - the Kindle Scribe features a 10.2" screen and the remarkable 2 has a 10.3" screen. The screen size is almost similar, there is not really a difference in 0.1" but the actual difference comes in the sharpness of the screen, the Scribe has a sharper display with 300 ppi, 74 more ppi than the reMarkable 2 (226ppi). The Kindle Scribe also has a front light that is useful in different lighting conditions that the remarkable lacks.

The Kindle Scribe has more reading customization features and compared to this the remarkable 2 doesn't have a dictionary, front light, and supports PDFs and epubs. On the reMarkable 2 you can change font size and line spacing but can't change letter spacing, which can be a letdown for some users.

Note Taking

When it comes to note-taking, the Remarkable 2 is actually superior to the Kindle scribe. Both devices offer good note-taking functions but the reMarkable 2 comes with extra features, it has different pen options such as Marker, Pencil, Fineliner, Calligraphy pen, etc. It also supports tilt sensitivity, you can shade with your pen, depending on the angle and on how much pressure you apply on the screen, because it has multiple levels of pressure sensitivity.

Of course, the Kindle also has pressure sensitivity and includes similar pen options such as Calligraphy and fountain pen like reMarkable 2 to compete with it. Feature-wise wise Amazon competed with the remarkable 2 by introducing various pencil options but the remarkable tab's paperlike texture and the writing experience it gives is still better because of its hardware, so for note taking it's a better choice.

App Support

On reMarkable 2 you get a lot of templates such as ruled pages, to-do lists etc. Additionally, with the Connect subscription, which costs $3 per month, you can sync and access files on the cloud via OneDrive, Dropbox, and Google Drive.

On Kindle Scribe, you get access to the Kindle bookstore, just like any other Kindle device, giving access to millions of books. It offers a number of templates too such as ruled lines, daily planners, to-do lists, dotted pages and many more. On Kindle, you get audiobook support through Audible which can be used via Bluetooth headphones. The Scribe offers OneDrive integration, but it does not support Google Drive or Dropbox. However, it includes a web browser that allows you to receive and send files, such as books and PDFs, via email.

But the Kindle needs a subscription for Onedrive integration to work with Word documents, it's around $ 70/year which is almost double the price of the reMarkable 2's subscription.

Which one is more paperlike?

The screen on reMarkable 2 feels more paperlike, it has a rough texture on the screen. when I write something with a pen I can feel its paperlike surface which is better than the Kindle Scribe.

So, which one is better?

Well, it depends on what features you are looking for. If you want a device for reading books only you get a lot of options on the Kindle Scribe, like Goodreads Amazon book library, and also a web browser, it's not like it is bad on the note-taking part as I have mentioned above it is pretty good but the reMarkable 2 is better. Both devices have a convert-to-text feature but on remarkable you will require a $3 per month subscription to use it. 


If your primary need is note-taking, then reMarkable 2 would be a better choice.

Overall Best

Overall, I would go for the Kindle Scribe as it offers a lot of options for reading books and even though remarkable gives a more paper like experience and has more options for note taking the Scribe is not that bad at note taking. Plus the scribe has a sharper screen and a front light, which is particularly useful in dark environments.

I hope this comparison gave you a clear insight. Feel free to drop your questions in the comments below. See you in another one ...

More reMarkable guides

reMarkable 2 Hard Reset to Factory Settings (Quick Guide)

I guess you already know what a hard reset does to a device. If you don't know it will completely wipe out what is stored inside the reMarkable 2.

But Why do a Hard Reset on reMarkable 2?

There are many reasons to do a Hard reset on the remarkable 2 such as -

1. If the remarkable 2 is facing issues like screen freezing, lag, unresponsiveness, a factory reset or hard reset can help in getting rid of these issues.

2. Over time your reMarkable tab can get filled with unnecessary files, cache and background process which slows down the device. And deleting these files one by one can be very time consuming. So a factory reset will do the job for you at once eliminating everything.

⚠️ Before a hard reset, I suggest you to keep a backup of your data or sync your data and progress with your reMarkable account so that after reset you can again log in into your account and have your important data. ⚠️

So, how do you actually hard reset the remarkable 2

Let me show you how you can do this -

Doing a factory reset is not a big deal just follow the steps given below and it's done.

  1. First, Go to 'Menu'
  2. Then 'Settings'
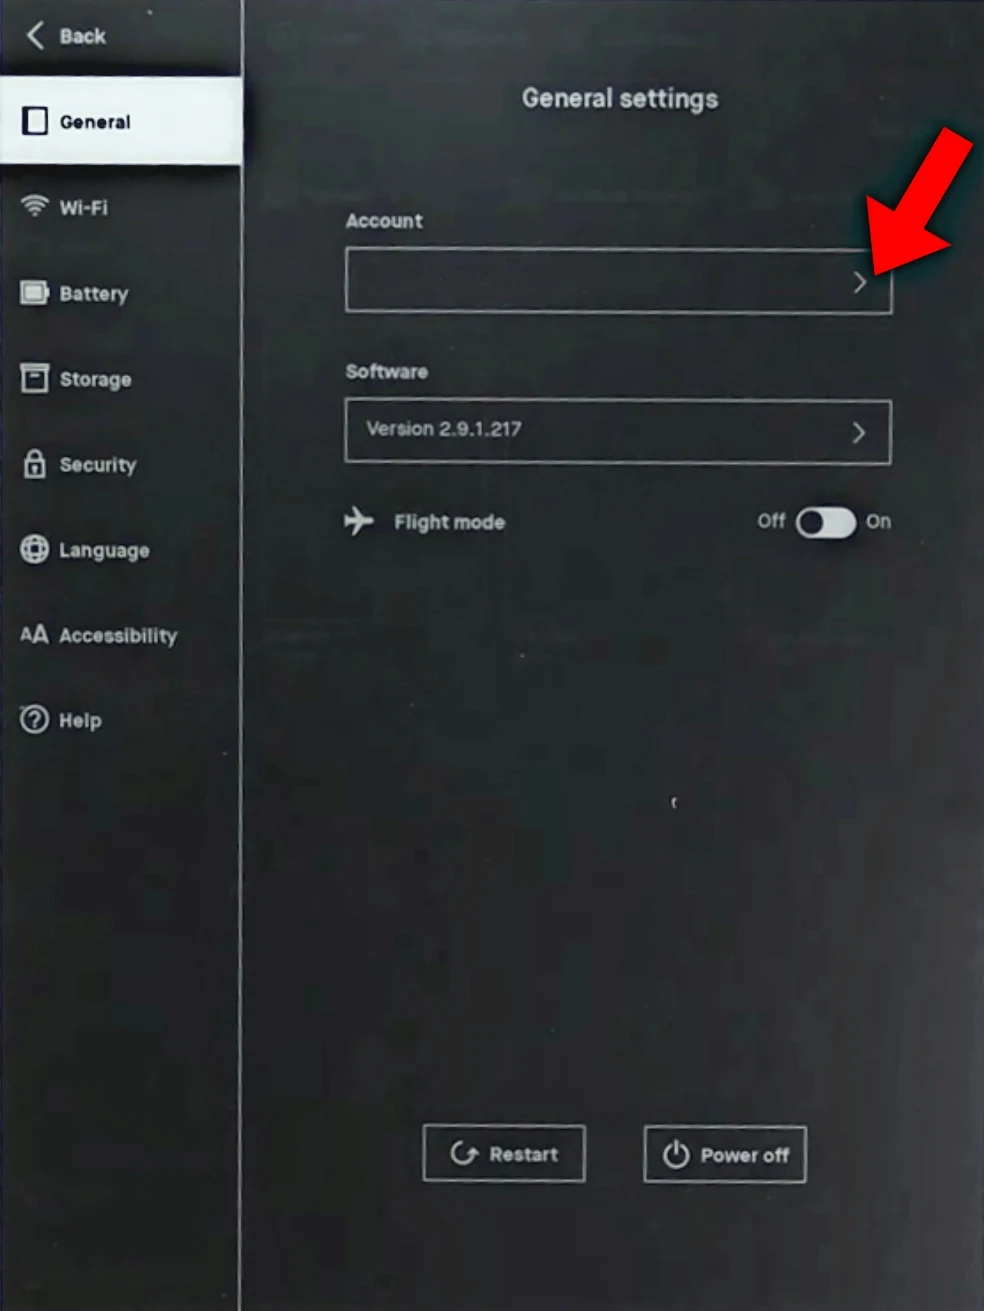
  3. Under Settings tap 'General Settings'
  4. After that, tap on 'Account'
  5. Then select 'Reset' and tap on 'Factory Reset'
  6. Confirm that you want to do it.
Hard reset remarkable 2


There you are, now wait for the device to reboot itself and after that freshly set it up with a Wi-Fi connection.

I hope you got that. If you haven't, you can drop your questions below 👇

Read More remarkable articles: 

Convert Handwriting to Text on reMarkable 2 - Fix Common Errors & Tips

Both the reMarkable 1 and reMarkable 2 have the handwriting-to-text conversion feature since they run on the same platform. The question is, how do you convert handwriting to text on a reMarkable tab, and how well does it work? Let's figure it out in this article -

How to convert handwriting to text in reMarkable 2?

You can convert your writings in a notebook to text on a reMarkable tab, here is how -

  1. Open a quick sheet and write what you want with your pen, just make sure your handwriting is good enough so that the system can recognize it.
  2. On the bottom left side of the page, you will find the 'Send" icon, tap on it and you will see the option to "Convert to text and send"
  3. A new page will be created with the converted text. And that's it, you have your text file.
Remarkable 2 handwriting to text


You can also convert multiple pages to text at once, here is how -

- Go back to grid view
- Select pages by holding them for a few seconds
- Then you will see multiple options at the top for modifying the page
- After that select the option - "Convert to text"

Remarkable 2 handwriting to text


Can reMarkable undo convert to text?

Yes, you can undo convert to text on remarkable tablets. When you convert a handwritten page, at the bottom of your tab you get an undo option, just tap on that to undo your handwriting.

Can remarkable undo convert to text


Does reMarkable 2 convert handwriting to text without connected to a network?

No, the reMarkable 2 requires an internet connection to convert handwriting to text. The device uses a cloud-based services to perform the (OCR) Optical Character Recognition and conversion process. So, without a network connection, the conversion feature will not work.


How do you delete a page on reMarkable 2?

If you want to delete a page or multiple pages at once press and hold the pages for a few seconds to select, then you'll get some options at the top of the screen, tap the delete icon, and then hit the confirm on the popup option.

Delete a page on remarkable 2


reMarkable convert to text showing - "Unknown error"

If you are getting error messages like "Unknown Error" or "Unable to convert that many notes" while trying to convert handwriting to text, there may not be only one reason to it. so I suggest you try the following solutions and check if it solves the issue.

- Check your Wi-Fi connection

Handwriting to text conversion needs a network connection, so if you are not connected to a proper Wi-Fi connection, fix that first, then try again.

- Restart the device

Sometimes you may get an error while using convert to text on reMarkable e-reader, this is because of minor glitches in the system, you can fix this by refreshing the system, which can be done by doing a reboot. (simply switch off the device and restart then try the convert to text feature again)

- Update your device

Outdated software can cause issues like this, Make sure your reMarkable device is running the latest software version. Bugs and issues like this often get fixed by software updates. Apart from this, it's always good to have the latest software.

- Reset your device

If nothing above works for you, you should try resetting your device. This can fix any other glitches that may be causing the error. 

NoteResetting your device will erase all data, so make sure to back up important notes and files before doing this.

After the reset, set up your device and try the handwriting-to-text conversion.

Tips for accurate handwriting recognition -

Here are some tips to follow, this way you'll have better accuracy in converting handwriting to text.

- Clear and consistent writing

The reMarkable 2's converting to text feature is quite effective but it works better when your writing is clear and consistent in size. Its better to avoid too cursive and styled handwriting as it may be difficult for the system to recognize all the characters.

- write in a straight line

Writing in a straight line helps the device more accurately differentiate between words and characters. It helps the process of converting text with fewer errors. You can add a lined background to write on.

- Sometimes reMarkable tab may not recognize the spaces or paragraph changes, and then you have to manually change them after the text has been converted.

That's all for this article, I hope this helps and feel free to leave your queries below 👇

reMarkable 2 Ghosting - How to Fix Afterimage & Ghost Writing Issues

reMarkable 2 Ghosting - Remove Afterimage

Ghosting is a common issue in e-ink displays, where afterimages of the previous screen remain visible even after you refresh the screen. It looks like the content is still faintly present on the display.

Ghosting issues can be distracting for users who want a clear screen. I mean it's pretty annoying when I can't even properly read the words of my current page because some fragments of contents of the previous page are still visible.

But you need to first differentiate if it is ghosting or dead pixel. Ghosting is a temporary issue but dead pixel is permanent which will leave a permanent spot on the screen.

Solutions - for Ghosting issue on the reMarkable tab

While Ghosting is a temporary issue that usually lasts for a very short time, there are still some measures you can take to prevent or fix it -

1. Regularly refreshing the screen -

Refreshing the screen helps, avoid leaving static images on screen for too long. you can refresh the screen by simply switching between different pages or contents, which naturally triggers a refresh. The main idea is not to leave the screen on a still image for too long.

2. Double-tap the power button to quickly refresh the screen.


3. Do a reboot -

If ghosting stays for too long, try rebooting the remarkable 2. Turn it off and then turn it back on. And this should reset the screen and the afterimages should be gone.

Does Ghosting affect the reMarkable 2 in the long term?

Most remarkable 2 users who are facing this issue, might wonder if ghosting can damage the screen in long term. But ghosting is generally a temporary issue and it won't affect the device. However if ghosting becomes too frequent and stays for way too long, then you should seek help from the remarkable support team.

Actually, this is not a big issue and NO your display is not damaged. It's perfectly fine. It's just the way e-ink displays work. Sometimes it takes a moment for the afterimage of the previous screen to fade because E Ink displays have a very low refresh rate. If you want to learn more here is a video on how E-Ink displays work.

Solving Ghost Writing on reMarkable 2

Another type of ghosting issue is Ghostwriting, you might see this when your marker writes on the screen without touching it.

First Check the following -

Touchscreen Response: Check if the screen is responding to touch. Use your finger to write something on the page.

Check Pen Settings: If the pen color is set to white or the eraser is selected, it might seem like nothing is appearing on the white background. Make sure to select a different pen color black is preferable.


If your reMarkable tablet is responding to touch but still facing Ghostwriting issues, try the following:

  • Check the tip of the marker for damage.
  • Clean the Marker Tip to remove dust and dirt.
  • Replace the Marker Tip with a new one.

That is all!

Please leave your feedback and feel free to share your experience with ghosting on the remarkable tab. See you in another one...

How to Fix "Network Failure: 0", on reMarkable E-reader Sync Issue

In this post, I am going to give you a solution to how you can fix the "Network Failure: 0" on your reMarkable e-reader.

You may see this "Network Failure: 0" or "Network Error 400" message while trying to sync the tab. Here is what you can do to fix this problem-

How to fix "Network Failure: 0" on reMarkable e-reader

First of all, make sure your reMarkable tab is connected to a Wi-Fi network, here is a guide from reMarkable on how to connect reMarkable tab to Wi-Fi

1. Do a simple restart:

I guess you have already tried this, whenever something is wrong with a device the first thing we do is restart it. A restart actually sometimes fixes minor glitches. If you haven't restarted the device, try it and see and if it doesn't solve the error move to the next solution.

To restart go to Menu > Settings > General > Tap on restart


2. Check Sync:

Go to Settings, then Storage, and after that tap on that 'Check Sync' button to check if there is any problem in syncing.

If this shows no problem, your device is okay. If you are still facing this issue you should try the last solution, it will fix the issue.


3. UNPAIR your account:

Go to Settings, then General, and then Account, now you'll see your connected e-mail account, you need to disconnect it, and then do a simple restart. After restarting log in that account into the device again. Doing this fixed the syncing issue on my device. This should be fixed on your device too.

Tip: Keep your reMarkable tabs software updated. You can enable auto updates on your device (make sure to turn it on)

To check for updates - Go to Menu > Settings > General > Software > Versions.


Let me know in the comment section if this guide solves your problem or not. Happy reading ☺️

Read More:


reMarkable 2 Not Erasing - Marker Pen And Erase Gesture Not Working

reMarkable 2 Not Erasing - How To Fix

If you are not able to erase your writings on the remarkable tab, this guide is for you. Now let's get started without wasting any time

First of all, have you tried all the methods of erasing text on Remarkable 2?

There are several methods to erase what you have written on a page using your stylus pen or Marker Plus.

Using the Eraser Tool

1. Open the Tools Menu

Select the "Eraser" option.

2. Erase with the Pen

Using your pen, simply move it over the writing you want to erase.

3. Using the second option - "Erase Selection"

Select the text by drawing a boundary around it like the image below, and the selected text will be erased.

remarkable 2 eraser not working


4. Using the third option - "Erase All"

This option will erase the entire page.

Using the remarkable pen (Marker Plus)

If you have the remarkable Marker Plus pen, you can use the other end of the pen as an eraser. Yes, this pen has a built-in eraser on the back, but the non pro version doesn't have an eraser.

What if erasing is not working?

If you can't erase using any of the methods above, then you should try the following methods, they might help

1. Changing layers

Maybe you are writing on a new layer which is why writings on the previous layer aren't getting erased, click on the layers tab and check how many layers you are using, go back to the old layer and you'll be able to erase your handwriting, This issue arises because writing on a new layer doesn’t affect the previous one, but the previous layer's content is still visible, causing confusion. To avoid this, Just make sure you are on the correct layer.

remarkable 2 change layers


2. If the remarkable Marker Plus Pen is not erasing?

If you are using the remarkable Marker Plus stylus, which has a built-in eraser on the back and it's not erased even when you are on the right layer, then try the following fixes -

  • Make sure the eraser tip is not worn out. Try using the eraser gently on another part of the screen to see if it works.
  • If the eraser tip is damaged, changing the tip should solve the issue.

3. Restart the device

Restarting the device can fix temporary glitches, anyways restarting won't harm the device and it's a good habit to restart any device from time to time. Just hold the power button for a few seconds and select "Restart" from the pop-up menu. After restart try erasing your writings again.

4. Keep the software updated

If there is any bug causing the eraser to not work, these bugs and glitches often gets fixed through software updates. So you can check for updates, go to "Settings" > "General" > "Software"

If the issue is still not resolved after trying all these fixes, then the problem is related to something else, and you should contact remarkable customer support in this case.

That's it for this guide. I hope this was helpful. If you want to ask anything or share any more solutions then the comment section is all yours. See you in another one...

Remarkable 2 Vs Remarkable Paper Pro - Is The Upgrade Worth It?

Remarkable 2 Vs Remarkable Paper Pro

After Remarkable 2, remarkable introduced its upgraded model the Remarkable Paper Pro for $579, which includes a standard Marker Pen and the big difference is that it has a color E-ink screen, a frontlight and more storage. But is it worth the extra cost? Let's see what other things it has compared to Remarkable 2 and help you decide.

Remarkable 2 vs remarkable paper pro

Technical Specs Comparison

ModelreMarkable 2reMarkable Paper Pro
Display10.3"
E-ink Carta
226 PPI - BW

11.8" ✅
E-ink Canvas Color
229 PPI
FrontlightNoYes ✅
Color
Temperature
NoNo
CPUDual core
1.2 GHz
Quad Core
1.8 GHz ✅
RAM1 GB2 GB ✅
Storage8 GB64 GB ✅
OSCodex OSCodex OS
Battery3000mAh
5030mAh
AudioNoNo
USBType CType C
Wi-FiYesYes
BluetoothYesYes
MicroSDNoNo
StylusYesYes
WaterproofNoNo
Dimension188 x 246 x 4.7 mm196.6 x 274.1 x 5.1 mm
Weight407g ✅522g
Page Turn
Buttons
NoNo
Price$400 ✅$579


Design

Remarkable Paper Pro is larger in size as it has a bigger screen and the bar present on the left of Remarkable 2 is absent in the Paper Pro. The Remarkable 2 weighs 407 gram while the Remarkable Paper Pro is 522 Gram, major weight gain in the upgrade. Also the Remarkable 2 is slimmer than the Remarkable Paper Pro. Here are the dimensions of both tabs -
  • Remarkable 2 - 188 x 246 x 4.7 mm
  • Remarkable Paper Pro - 196.6 x 274.1 x 5.1 mm

The Display

Remarkable 2 has a 10.3" E-ink screen with no frontlight, and the Paper Pro has a 11.8" color e-ink screen, marketed as a Canvas color display with 229ppi on both BW and Color content. 

remarkable paper pro color manga reading
reMarkable Paper Pro (image - Kit Betts Masters)


Unlike the Remarkable 2 The screen on the Paper Pro now has a frontlight which is an essential feature. You can increase and decrease it which is again extremely useful in the dark. However it lacks warm and cool light adjustment option.

Writing experience

Both device comes with a stylus - standard Marker Pen, which can be used for writing and can be charged by magnetically attaching to the Right side of the device. Coming to the writing experience, the Paper Pro feels a bit rougher than the Remarkable 2. Writing on the Remarkable 2 feels a little softer than the Paper Pro. Remarkable 2 was already a paperlike device but The Paper pro takes it to the next level.

Some people might find the writing on the Paper Pro a bit too rough. Also the Pen input is a little faster along with faster navigation, it's because of the new upgraded Quad core NXP iMX8 Mini Processor  and the 2GB RAM. In comparison, The Remarkable 2 has a dual core CPU and a 1GB of RAM. As You can see, its obvious that the Paper Pro is faster in every task.

Note - The Remarkable 2s Marker Pen doesn't work on the Remarkable Paper Pro

Typing and Touch response

If you don't use the Marker Pen and type with your hand, the touch response is still better on the Remarkable Paper Pro. Additionally, the display shows slightly sharper text compared to the Remarkable 2, although its not a very noticeable difference. but still when you read manga and comics and zoom in you can see the difference.

Internal storage

The Remarkable 2 has only 8GB of storage (6GB available for user) which may not be so good if you want to store a lot of books and files. But on the Paper Pro you get 64GB of storage (46.32 available for user) which is 8 times larger than the Remarkable 2.

Battery life

The Remarkable 2 features a 3000 mAh battery that takes approximately 120 minutes to fully charge and the Paper Pro is powered by a 5030 mAh cell, which can be charged fully in around 90 minutes. Both devices gives around 2 weeks of battery life on moderate use, can even last longer if used efficiently (like turning off auto sync, not using frontlight) Remarkable Paper Pro has a bigger battery but its larger screen and frontlight also consumes more power, that's why ultimately it gives identical backup on a single full charge.

Who is it for?

The Remarkable Paper Pro is designed for people who wants a note taking device with paper like writing experience, manga and comic lovers and people who likes drawing.

Why Choose the Paper Pro over Remarkable 2?

Because it's better but also more expensive but it's worth the money for the added features. Such as -

  1. A faster processor and improved performance. Many people using the Remarkable 2 faces lag and freezing issues because of it's weaker CPU, if you already own a Remarkable 2 and thinking of upgrading , I'm sure you have also faced lag and freezing on the Remarkable 2.
  2. The other upgrade is the Color screen, with a color screen you can enjoy color manga, comics and graphic novels, It also enhances the experience of drawing and digital art.
  3. How can we forget the LED backlight, it's a totally useful feature in low light and dark conditions.

For many people 11.8" might be too big, so the choice depends on you. You have to decide what you want. While it is for sure an upgrade over the Remarkable 2. And I know it's costly compared to other brands like Onyx Boox and Kindle but it gives a true paper like experience. If price is not a problem, the Paper Pro is a great option., it's definitely better than the Remarkable 2 in many aspects.

I hope this comparison helped you get some clarity on which one to buy. Your feedback is very important for me and I'd appreciate getting your thoughts on this.

reMarkable 2 Frozen Screen, Unresponsive & Lag - How to fix?

Sometimes my reMarkable 2 paper tablet becomes unresponsive, either it's completely frozen or it's slow with a very bad touch response, almost unusable. You might be facing the same issue that's why you are here. These are the ways that resolved my problems on the reMarkable 2 tablet. You can apply them on the reMarkable 1 and rM Paper Pro.

How to fix frozen screen, unresponsive and lag on reMarkable 2 paper tablet?

1. A simple restart:

Many times after doing a simple restart it fixed unresponsiveness, glitches, and sync issues on my tab. I'm sure you already know how to perform a restart. If you don't know -

  • Go to MENU (It's on the top left corner of the screen)
  • Tap on SETTINGS
  • Then GENERAL
  • Under GENERAL press 'Restart' and confirm to restart the reMarkable 2.
Restart remarkable 2 paper tab

Remarkable 2 fix lag and unresponsive
remarkable 2 frozen not responding to touch


2. A soft reset:

A soft reset is when you simply reset a device without wiping all the data on it. Sometimes a soft reset can fix the unresponsiveness and syncing issues on the reMarkable 2 and 1.

Here is how to do a soft reset on the reMarkable 2:

  • Press and hold the power button for 10 seconds.
  • Wait till it turns off
  • Again press and hold the power button to turn on the device.
Your tab should be lag free and responsive now. (At least better than earlier)

3. A hard reset:

A hard reset will delete everything from the reMarkable 2 and make it fresh like new. Of course, you need to set it up again. So, make sure to backup your important files, account information, and settings before doing a hard reset. Sync everything to the cloud.

Here is how to hard reset a reMarkable 2 paper tab -
  • Go to MENU
  • Tap on Settings
  • Go to GENERAL SETTINGS, and tap on "ACCOUNT"
  • Click on Factory Reset and confirm.

4. Keep your storage clean:

Junk files that you do not need anymore will just take up space for nothing and make the system slow. Another way to prevent any device from slowing down is to keep it clean. Keep only essential data on storage.

5. Keep the software updated:

Software Bugs and glitches are fixed mostly in the latest version of the OS. So, it's better to keep the software updated. Remarkable devices are set to get automatic updates. When an update is there you will see a notification. Tap on the 'Update' option to install the update. Once you tap the device will restart to install the latest updates. 

You can check if auto updates are turned on or not - (make sure to turn it on)

Go to Menu > Settings > General > Software > Versions.

The latest version is 3.18.


That's all folks

Thanks for reading my guide, your feedback is welcomed.


Kobo Plus VS Kindle Unlimited : 2025 Detailed Comparison

Kobo Plus VS Kindle Unlimited

Confused between Kobo plus and Kindle Unlimited? Wondering which one is better? Then this guide is for you. Choosing the better eBook subscription is important after all, you should get appropriate amount of value for your paid money.

Both Kobo Plus and Kindle Unlimited have millions of books but they are different in terms of book availability, support, pricing and other features. Below is a detailed explanation to help you decide.

Kobo plus vs kindle unlimited

1. Library and content availability

Kobo Plus - Kobo Plus has millions of eBooks and more than 150 thousands audiobooks across multiple genres, Kobo plus features more regional and indie authors making it ideal for people wanting to explore different genres and underrated authors. However Kindle unlimited has a larger library than Kobo Plus. Now, let's talk about Kindle Unlimited.

Kindle Unlimited - With Kindle Unlimited you can access more than 4 million books, including many well known bestsellers, popular series and Amazon exclusive books. Kindle unlimited also includes thousands of audiobooks through whispersync, which allows users to switch between reading and listening to the same book.

Verdict - Kindle unlimited offers a larger library, and includes all mainstream and indie titles. While Kobo Plus has millions of books but not as many as Kindle Unlimited, So Kindle unlimited wins here.

2. Pricing and plans -

Kobo Plus - Kobo plus offers three plans to its users -

  • Kobo Plus read (ebooks only) - $7.99/Month
  • Kobo Plus Listen (Audiobooks only) $7.99/Month
  • Kobo Plus (ebooks+ audiobooks) - 9.99/Month

Also, Kobo sometimes offers free trials during seasonal and festive periods. Which allows users to try out the service before paying for a subscription.

Kindle Unlimited - Kindle Unlimited has only one plan which is priced at $11.99 per month (Both ebooks and audiobooks). Amazon also gives trials and discounts for Kindle unlimited, you should get a subscription during festive period.

Verdict -As you can see, Kobo Plus is more affordable and you get options for only ebooks or audiobooks and Kindle Unlimited is slightly pricier. Kobo wins.

3. User experience and features

Kobo Plus - Kobo plus has a simple user interface, where you can download books for offline reading, adjust fonts and also has reading statistics. Kobo has a reading life feature which enables users to track their reading progress.

Kindle Unlimited - Kindle unlimited has a wide range of features such as instant dictionary access, and whispersync for syncing across different device. (Phone and ereader). Also you can read your books offline after you have downloaded it.

Verdict - Kindle unlimited offers more features and a good ecosystem for users. While Kobo Plus focuses on a simple user interface with essential features. Personally I would choose the Kindle Unlimited but you can decide this for yourself.

4. Availability in your country

Kobo Plus - Kobo plus is primarily available in countries like the US, Canada, the Netherlands, France but they are expanding their services. Kobo plus may not be available in your region, so checking if it is available in your country or not before deciding is a good idea.

Kindle Unlimited - Kindle unlimited is widely available across many countries like the US, UK, Canada etc. Amazon's broad international presence makes Kindle unlimited accessible to more readers across the world.

Verdict - Kindle Unlimited is widely available, but Kobo plus is also progressing. Kindle Unlimited takes the lead.

Pros and Cons - Kobo Plus VS Kindle Unlimited

Kobo Plus Pros 

  • More Affordable than Kindle Unlimited
  • Audiobooks only plan.

Kobo Plus Cons -

  • Fewer book options compared to Kindle Unlimited
  • The community is smaller than Kindle Unlimited
  • Limited regional availability

Kindle Unlimited Pros -

  • Large library of books and audiobooks on every genres, including older titles
  • Large user base with active community, offering Facebook groups for recommendations and discussions
  • More Global availability

Kindle Unlimited Cons -

  • More expensive than Kobo plus.

Final Verdict - Which one is perfect for you?

Why Choose Kobo Plus - If you think Kindle unlimited is too costly for you and want a budget friendly option or if you want a dedicated audiobook or only ebook option, then Kobo Plus is a great choice for you.

Why choose Kindle Unlimited - If you want a larger selection of books or maybe only Kindle unlimited is available in your country, then Kindle Unlimited is a better choice for you.

That's it. I hope you liked this comparison. Please share your feedback and tell us which one you would prefer? I'll see you in another one.